Your Cart is Empty
Two winners get a $100 shopping spree - enter here!
Racking the Slide
“My wife can’t always rack the slide, so even though she wants a semi-auto, I am going to insist she gets a revolver.”
“I like my revolver okay, but I’d sure like to try a semi-auto. Problem is, I can’t pull the slide back.”
“I can almost pull the slide back, but not far enough to lock it open.”
“I’m not strong enough to do the slide …”
If I had a nickel for every time I have heard variations on that theme, I’d be a wealthy woman today. Despite this, it is my contention that healthy adult women who really-and-truly cannot be taught to rack a slide are very, very, very rare. I’m almost tempted to say there are none at all.
A lot of men who have shot for years have never learned how to rack a slide without using a lot of muscle. They have not learned the easiest techniques, because they haven’t needed to. As a result, when these men become informal instructors for their female loved ones, they don’t know what to do if a woman can’t just muscle the slide back in the same inefficient way many men do. Soon these men become convinced that “Women just can’t …” And their female loved ones buy the lie, thinking of themselves as too weak to run a modern firearm.
|
Racking the slide is not about strength. It is all about technique.
|
It is true that a lot of women cannot rack a slide simply by muscling it through. There’s no shame in this! A woman’s strength is usually centered in her lower body and particularly in her legs, rather than in her upper torso and arms. But there are techniques which work with a woman’s strengths, rather than against them.
Probably the biggest hurdle you will have to overcome, since you are reading this article, is the belief that you’re not strong enough to rack the slide and that racking the slide is a matter of brute force. It is not. Technique matters far more than muscle. If you have difficulty, don’t give up. You can learn this — honest, you can.
Another misapprehension I sometimes see is that some people are reluctant to be aggressive in handling the firearm. They want to baby it, trying to move the slide slowly or gingerly. Please believe me on this one: there is very little you can do with your hands to damage this piece of modern metal. The gun is designed to cope with extremely high pressures from the inside, and the slide is designed to travel far faster than you will ever be able to move it. The springs inside it are built to cope with far more energy than you’ll ever produce with your hands. You cannot hurt the firearm by moving quickly.
Finally, some women are afraid the slide will bite them or otherwise hurt their hands. A gruff instructor might just growl, “Get over it,” but maybe that’s a little harsh. If you are afraid of the slide and its movement, I suggest you ask a knowledgeable someone to show you the internal parts of your semi-automatic and educate you about exactly what each part is doing and why it is doing it. Then pay special attention to the photos below so that you learn where you can safely place your hands during the process. With your hands placed correctly, you are less likely to get pinched or poked if you move quickly rather than slowly. Finally, if there are any sharp or pointy edges on your firearm, consider asking a gunsmith to gently soften the offending corners.
A Note About Safety
 No matter how much you may struggle with the slide, do not put your finger on the trigger. |
Let us start by discussing safety. The very first rule in learning to rack the slide is that all other firearms safety rules still apply.
Human hands have a sympathetic grip reflex. When one hand clenches, the other hand often closes along with it. When part of the hand closes tightly, the rest of the hand wants to close just as tightly. This can be a problem because your trigger finger will be affected by this reflex. As you grasp the slide, your trigger finger will want to join the other fingers of your grip hand as they tighten, and will often curl right into the trigger guard and onto the trigger. Especially if racking the slide is difficult for you, you must consciously prevent your finger from curling onto the trigger while you work the slide.
The other common safety bugaboo for those who are first learning to rack the slide is that it can be difficult to remain aware of muzzle direction while your mind and hands are learning this new skill. But for safety’s sake, you must always be conscious of the direction the gun is pointed, just as you must every other time you handle a firearm. Even though it may be difficult, it is very important that you never point the firearm at anything you are not willing to shoot.
Occasionally, you will encounter people who cluelessly or deliberately point the firearm at their own abdomens or at their weak-side forearms and elbows while they are racking the slide. Please do not emulate these people. The risk simply is not worth it.
Positioning Your Hands
The first step is to get a good grip on the butt of the gun with your firing hand. This grip should not be too different from your normal shooting grip, except that your trigger finger stays far outside the trigger guard. If you index it along the frame, make sure it is high on the frame so that the sympathetic grip reflex doesn’t trip you up.
With your dominant hand on the grip of the gun, your non-dominant hand is free to grab the slide. You can grab the slide in one of two basic ways, both shown below.
Good Slide Grasping Techniques

Slingshot
Shown with gun rotated port-up, but better done with gun port-down.
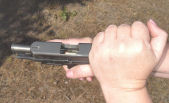
Overhand
Probably the strongest technique for most people.
The option on the left, called the slingshot grasp, is generally a little more difficult for most people but works well for others. Option two is the overhand grasp, which is generally easier for most people. Since every human hand is different, you will need to try both and figure out which one works best for you.
Poor Slide Grasping Techniques

Weak Pinch
Not recommended.

Covered ejection port
Unsafe.
The picture on the left shows a weak pinch. This simple pinch is not a good idea because it is just not strong enough for most people. You will generally need to get a little bit more hand on the slide for strength, as shown in the picture titled “Slingshot” in the upper photos.
The photo on the right shows an overhand grasp that is badly placed. The ideal overhand grasp goes just behind the ejection port, which is the part of the gun from which the empty shell casings come out. You should never cover the ejection port while there is still a round in the chamber. One reason is because covering the port can prevent the chamber from being emptied when you rack the slide, and may even cause a jam. But the more important reason not to cover the ejection port is that doing so can be somewhat dangerous. If the primer is punched while you are struggling with the slide — rare but not impossible if your firearm has a protrusive extractor or ejector — the shell casing is likely to split and the full force of the round may detonate in the palm of your hand. This could be rather messy and uncomfortable.
So grasp the grip firmly with your shooting hand, and grasp the slide firmly with your non-shooting hand. Do not cover the ejection port.
Racking the Slide
Now that you have positioned your hands, you need to find a position for your arms and body that will maximize your strength and allow you to move the slide efficiently. Human beings tend to be strongest at the midline, with hands fairly close to the body. When you extend your arms straight out, you lose some of that essential strength. Similarly, you don’t want the gun too far to one side or the other. Just bring it back to your center, somewhere around or perhaps just above your belly button. Keep the gun pointed downrange at all times; do not allow it to point at other shooters on the line.
 Bring gun to midline Keep the gun pointed downrange, not at other shooters on the line. |
From this point, you have two choices.
Method One is simply to drive your gun hand sharply forward while holding the slide firmly in place so that it does not move with the gun. When I say to drive the gun forward sharply, that is exactly what I mean: you want a quick, explosive movement of the grip hand, punching it out and away from your body. The movement is sudden, fast, explosive. You may pull back slightly on the slide while this is happening, but “pulling the slide back” is not the goal. The goal is to punch the gun forward while the slide stays still.
Do not think of it as pulling the slide back, but as punching the gun forward.
 Method One: punch gun sharply forward, holding the slide still while the gun is in motion. |
Method Two is harder to describe with the written word than it is to perform on the range. In this method, you anchor your dominant elbow to your dominant hip, and then quickly rotate your entire hip and lower body to punch the gun forward while holding the slide in place with your non-dominant hand. This one works really well because it recruits your strongest muscles, those in your legs and lower body, to do the work of moving the slide for you.
 Method Two: Anchor Elbow. Use hip to drive gun forward under the motionless slide. |
You must punch the gun forward fast and hard, so that the slide quickly hits its rearmost point. But this is not all there is to racking the slide.
Once the slide has gone all the way to the rear, you will need to let go of the slide so that it can travel forward on its own. The slide needs to travel forward again under its own spring tension in order to load the gun properly.
Note: if you are not loading the firearm, but instead want the slide to close on an empty chamber, you can and should lower the slide gently by hand. But to “rack the slide” when loading, you must allow the slide to close itself without softening its fall in any way.
Some people have a hard time letting go of the slide after getting it back. They let their slide hand travel forward with the slide. This is called “riding the slide” and it is a bad habit. In order to avoid this bad habit, create the good habit of simply opening your hand when you feel the slide hit its rearmost point. If necessary, slap yourself on the shoulder with your slide hand as the gun hand continues to travel forward. This will keep your slide hand from reflexively traveling forward with it.
Once you have figured out how to rack the slide quickly and decisively, practice the motion a few times (don’t wear yourself out!) before you move on to the next step.
Locking the Slide Open
At this point, you may be saying, “Wait a minute. I can move the slide okay. I just can’t get it to lock back!” Have no fear — there’s a secret, easier method to doing that, too.
To lock the slide to the rear, you will be doing the same series of motions that you did above. However, before you punch the gun forward, you are going to shift your grip hand around just far enough that you can lift of up on the slide stop lever during the entire time that the gun is in motion.
 Locking the Slide Push up on slide stop lever the entire time the gun is in motion. |
The reason you are lifting up on the slide stop lever the entire time is that it takes a lot of strength to hold the slide to the rear while you fumble around looking for that annoying little lever. So you instead will explosively punch the gun forward with the lever prepped to slip into place when the slide gets to the right point.
You should be aware that semi-automatic slides can be retracted up to an inch further back behind the slide lock point. You are not pulling the slide back to its rearmost point, but only most of the way there. That is another reason to put upward pressure on the lever while racking the slide — you won’t have to struggle to hold the slide back while moving it back and forth looking for the magic spot. With upward pressure on it, the stop lever will simply slip up and into place, locking the slide into place the first time the slide nears the lock point.
If you absolutely cannot find a hand position which allows you to reach the slide stop lever while punching the gun forward, it may be time to consider personalizing your gun by installing slimmer grips, getting a grip reduction, or even purchasing a different gun whose grip size is more suited for your hand.
For Lefties Only
Left-handers have some special challenges when it comes to running guns which are designed for right-handed people. This is nothing new for us lefties, since by the time any lefty reaches adulthood, we’ve all had years of practice at overcoming such challenges. Although it can be discouraging at first, remember that this problem is not impossible. It’s just one more adaptation to a right-handed world.
If your firearm is not truly ambidextrous, but you are running the gun left-handed, here is what you will need to do in order to lock the slide back. Maintaining your firing grip upon the gun with your left hand, and with your trigger finger far outside the trigger guard, place your right hand over the top of the slide with your right thumb along the left side. Grab the slide firmly, using the muscle at the base of your thumb to grip the slide on the thumb side.
This grip should enable you to reach the slide lock lever with your right thumb.
To retract the slide, just like the right-handers you will drive the gun quickly forward with your left hand while holding your right hand immobile or pulling it back just slightly, or you will anchor your left elbow to your left hip and drive the gun forward with your left hip while holding the slide immobile with your right hand. Practice this motion a few times before you try to lock the slide.
To lock the slide, use your right thumb to pull up slightly on the slide stop lever.
 Lefties: use right thumb to pull up on slide stop lever. |
If you cannot pull up on the slide stop lever with your right thumb without covering the ejection port, that is okay as long as you have checked that there is no round in the chamber. First drop the magazine and rack the slide several times, making sure there is no round in the chamber. When there is no magazine in the gun, and no round in the chamber, it is not unsafe to cover the ejection port while you lock the slide. Be careful not to get the meat of your hand pinched within the port if you need to lower the slide from this grip.
You can do this …
Although working the slide can be a challenge for many novice shooters, with a little determination and willingness to experiment the challenge can be mastered. If after reading the instructions above you still have difficulty, find yourself a competent female instructor and ask her to show you how she does it. Do not get discouraged, and do not give up. You CAN do this!
~~~~
By Kathy Jackson of The Cornered Cat. Shared with permission. Kathy Jackson's book "The Cornered Cat: A Woman's Guide to Concealed Carry" is a must-read!
Also in Skill Building: The Fundamentals

Beyond the Four Rules: Building on the Basics of Gun Safety
The 4 main rules of gun safety are a good starting point, but there's more to be aware of. Here are a few some tips to stay safe with your firearm.
Read More
Tips for Drawing From a Holster — A Beginner's Guide
Drawing from a holster is an important competency, especially if you carry a gun. Here are a few tips to help you feel more confident when mastering this skill.
Read More
The Top Fundamentals of Handgun Shooting
Do you know what shooting fundamentals are and which skills you should be working on right after you purchase a gun? Here's our list of three of handgun fundamentals you should master right away.
Read More